
As far as welders go, I am really good at grinding tungsten.
One of my recent tungsten grinding projects was building a computer desk for Simmone.
The brief was that it had to be able to roll around to different locations and be usable while at the couch/sofa. That meant some kind of cantilevered design with no front legs. I got out some scrap paper and sketched a quick, ugly cantilevered desk as shown in the first image below. Then I pretended to be the desk by holding Simmones keyboard as she sat at the couch and typed. I now had the most important dimension – height for comfortable typing – 680mm.
The problem with the design was that it was ugly. Even on paper it was ugly, and if you added terrible welds and a shoddy paint job to that, it would be even uglier. So we got on the interwebs and looked for different design ideas. After a bit of searching we found an idea on a site called pin-gram or inst-a-rest or something. Sadly I can’t find the picture again. You will just have to imagine what a professionally made desk, in a clean display home, with decent photography looks like.
The design we came up with is on the second image below. It also has some more dimensions fleshed out which we didn’t end up keeping.


The first welds all went well, as they often do. In no time at all I had the base made up with the wheels and glides held on temporarily with double sided tape. I took it to the the lounge room just to make sure it would fit everywhere needed. I then welded on the angled upright and the horizontal bit at the top. All still good and straight even though I didn’t get photos of those bits.


Then I attached the braces and things stopped being straight.
Now for people familiar with welding this is probably not a surprise at all. For people unfamiliar, I will need to explain. When you weld a piece of metal, you are burning its skin. It hates you for this and will try to spite you. It does this by bending, therefore making your project look like you were drunk when you made it, so all your friends will laugh at you.
Some people claim the bending is due to the fact that after the intense heat of welding the metal shrinks as it cools down and THIS pulls the welds out of square. Trust me on this one though – it is spite. There are however tricks to stop it happening. The simplest of which I will explain here with the help of a few diagrams.
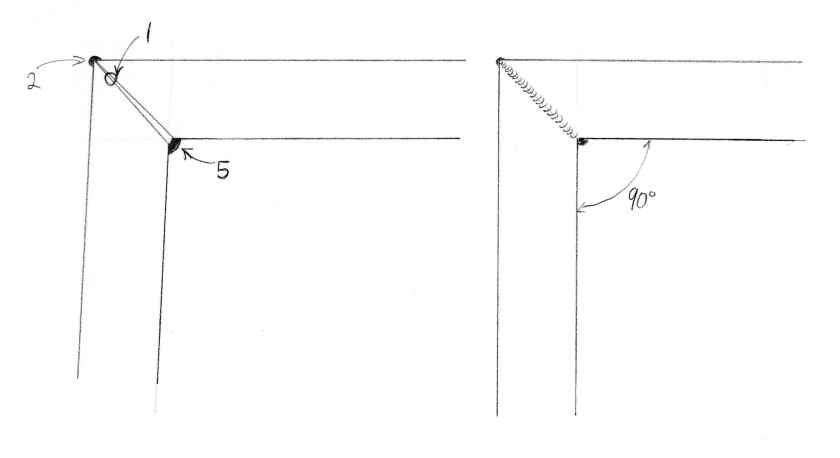
As explained above, the metal will try and spite you by pulling out of square. What you need to do it is trick it. If you look at the set up on the left side of this diagram you will see before the weld we have the metal at greater than 90 degrees. You then carefully order the welds to trick the metal into pulling the assembly INTO square. Step one is to do a tack weld. Step two is to run a bead along the outside edge. Steps three and four probably involve a sandwich and maybe a rum. The final step is to weld the inside edge that will cause the assembly to pull into square.
That is the theory of it all. Sadly I usually end up with something that looks more like this.

Which is not so bad really. With the times like these, I often end up having to go on a quest to save the world from a great nothing. They come in handy for that.
Back to the current quest to build a computer desk. The braces that are needed to stop the whole desk just folding only connect to the long straight pieces from one side (as shown). This will cause the [long straight pieces] to instead, just be [long pieces]. The diagram shows what the desk ended up looking like side on. Photos could not show up the bow, but the top of the desk was no longer level and the wooden top would not sit flat.


This time I could not trick the metal with the order I welded. This time I had to torture it to make it behave. An extra two or thee beads were welded on the opposite side to the weld that caused the first distortion and kind of cancelled it out. These beads were then ground flat.


Everything then got a sanding and a painting. The bit of plywood at the top was sanded, varnished and screwed down. The castor wheels on the back got screwed in, and I could pretend I was actually useful for a little bit.


Finally a couple of shots of the desk in its natural habitat.


Hmm. That’s steel, right(ish?) I guess you’re *melting* it with tungsten, you’re not literally grinding the stuff, or are you? Do you know the cheap stuff is radioactive? You *really* don’t want to be grinding **that**!
LikeLike
For the straightening of the bent stuff I am melting the steel by welding a few beads on the back. This then leaves the steel with a bead on it which I grind off with the an angle grinder.
The tungsten I use is thoriated (radiactive) but the amount I use it I get less radiation from that than the bananas I eat.
LikeLike